
Implementation Dashboard
Building Your Goddess Quiz Funnel
A complete, step-by-step guide to connecting your Typeform score matrix to GoHighLevel — without Zapier, without 64 workflows, and without custom code. Check off each step as you complete it; your progress is saved automatically.
Complete
Funnel Architecture Overview
Here is how data flows through your funnel from quiz submission to personalized email delivery.
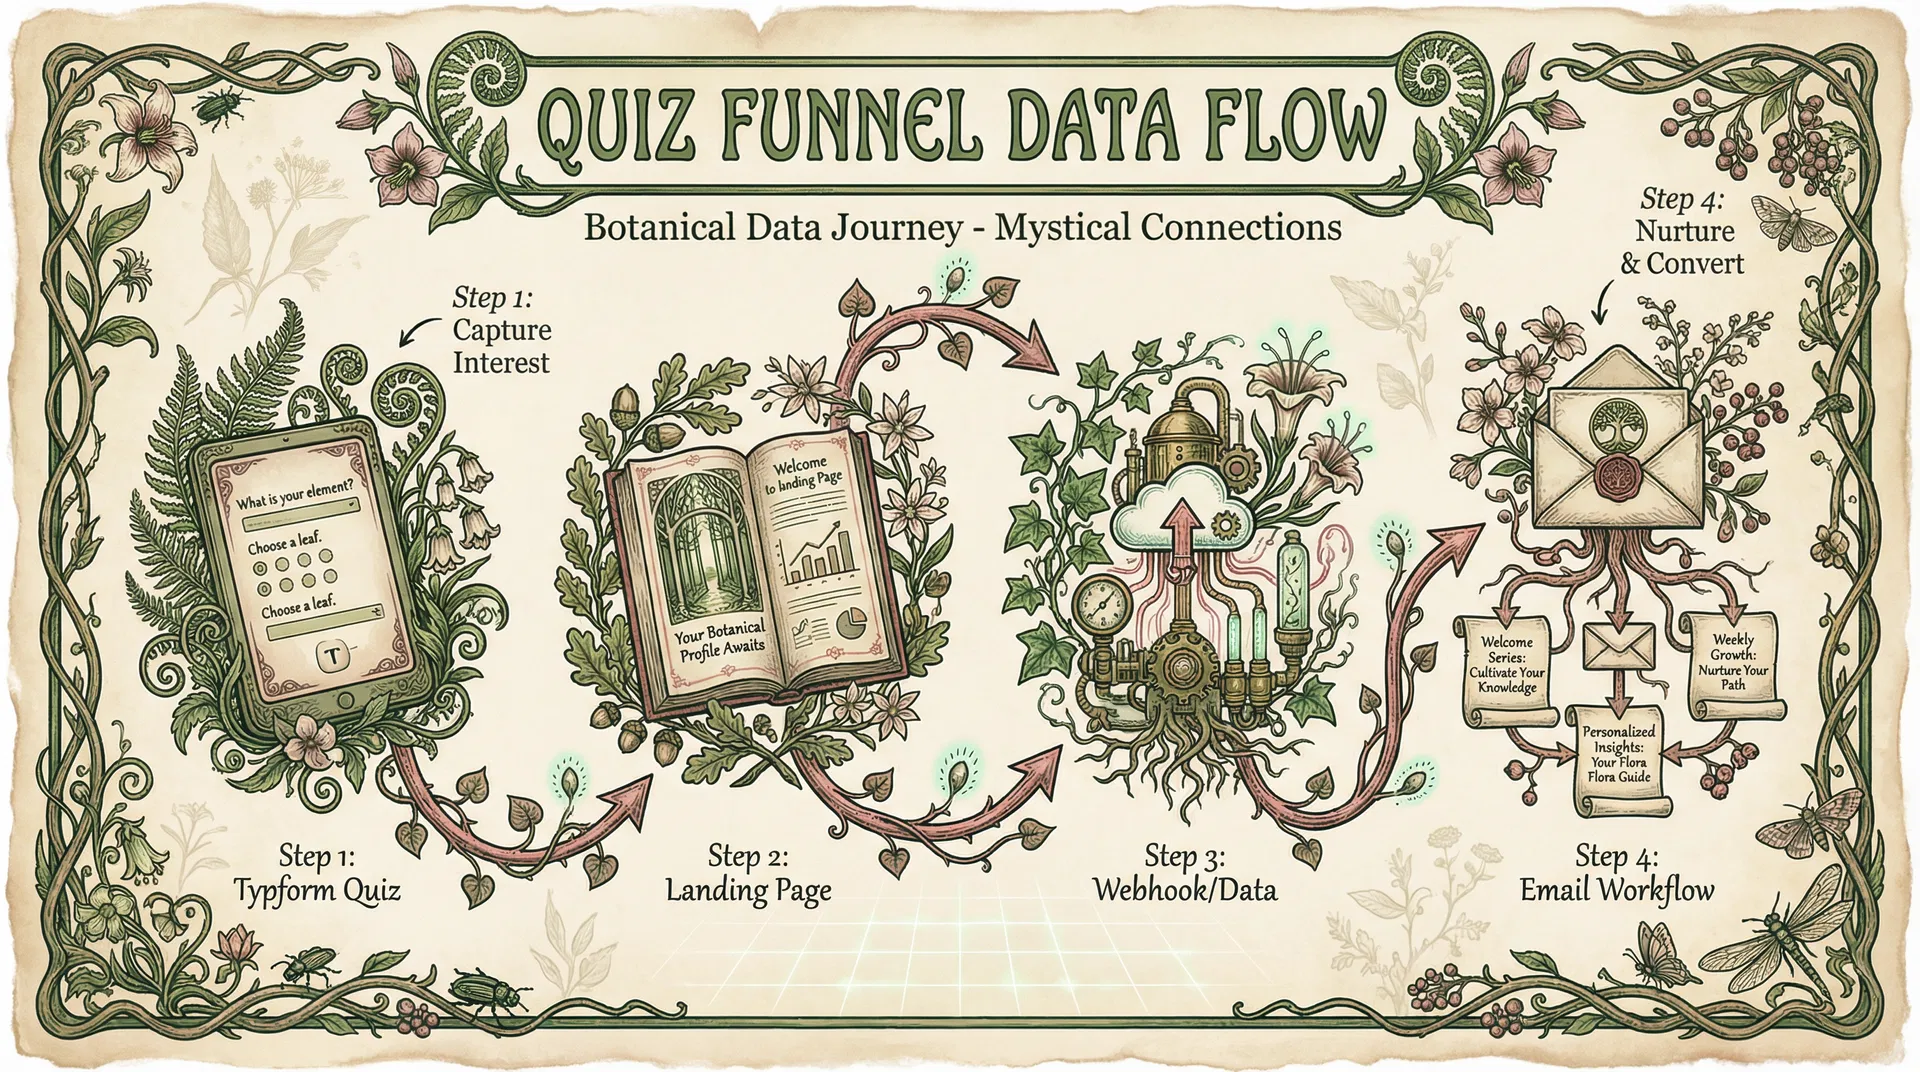
Typeform Calculation
Typeform calculates scores and determines the dominant and dormant goddesses using Custom Variables based on the user's answers.
Dynamic Redirect
Upon submission, Typeform redirects the user to a GHL landing page, passing results as URL Parameters (e.g. ?dominant=Athena&dormant=Aphrodite).
Dynamic Landing Page
GoHighLevel reads the URL parameters and dynamically displays the correct dominant goddess result, along with your upsell offers.
Webhook Data Transfer
Simultaneously, Typeform sends the lead's contact information and quiz results directly to GoHighLevel via an Inbound Webhook.
GHL Workflow Automation
GoHighLevel receives the webhook data, creates/updates the contact, saves their goddesses into Custom Fields, and triggers an email Workflow.
Email Delivery
The Workflow uses an If/Else branch to send a personalized email focusing on their dormant goddess, while dynamically inserting the dominant goddess name.
Phase 1: Preparing Typeform
Configure Custom Variables & Redirect URL
Ensure you have Custom Variables in Typeform that store the final text value of the dominant and dormant goddesses.
- 1In Typeform, go to the Workflow tab and click the (x) Variables icon.
- 2Click + Add custom variable and choose Text from the drop-down menu.
- 3Create a variable named dominant_goddess (leave base value blank).
- 4Create a second variable named dormant_goddess (leave base value blank).
- 5Note: Only lowercase letters, numbers, and underscores are accepted in variable names.
Instead of using Typeform's default End Screens, redirect users directly to your GoHighLevel funnel page with the results embedded in the URL.
- 1In Typeform, go to the Endings panel and click + to add a Redirect to URL ending.
- 2Enter your GoHighLevel landing page URL as the base.
- 3Use Typeform's Recall information feature (type the @ symbol) to insert your variables into the URL.
- 4Your redirect URL should look exactly like the example below.
- 5When you type @dominant_goddess, Typeform creates a dynamic bubble representing that variable — it will be replaced with the actual goddess name on submission.
Redirect URL Template
https://yourdomain.com/quiz-results?dominant=@dominant_goddess&dormant=@dormant_goddess
Phase 2: Building the Dynamic Landing Page
GoHighLevel Dynamic Text via URL Parameters
Build your main results page in GoHighLevel. This page will reveal the dominant goddess, the eBook upgrade offer, and the Sacred Leadership Initiation upsell ($111/month).
- 1In GoHighLevel, go to Sites > Funnels and create a new funnel called 'Goddess Quiz Results'.
- 2Add a new page step and design your results page with sections for: the goddess reveal, the eBook upsell, and the Sacred Leadership Initiation offer.
- 3Design the page to look beautiful even before the dynamic content loads — use placeholder text like 'Your Goddess' that will be replaced.
Anywhere on the page where you want to display the dominant goddess name, use GHL's native URL parameter syntax. GoHighLevel will automatically read the URL and replace the placeholder with the actual goddess name.
- 1In the GHL page builder, click on any text element where you want the goddess name to appear.
- 2Type the parameter placeholder exactly as shown below (double curly braces).
- 3Because your Typeform redirected the user to a URL ending in ?dominant=Athena, GHL will automatically replace {{dominant}} with 'Athena' on the live page.
- 4You can use the same approach for the dormant goddess: {{dormant}}.
GHL URL Parameter Syntax
{{dominant}}

// Example usage in your page copy:
"Welcome, sister. Your dominant goddess energy is {{dominant}}."
"Your dormant goddess — the one calling to be awakened — is {{dormant}}."Phase 3: Connecting Typeform to GoHighLevel
Native Webhook Integration — No Zapier Required
Before sending data, GHL needs a place to store the goddess results on each contact record.
- 1In GHL, go to Settings > Custom Fields.
- 2Click Add Field and select Single Line Text as the field type.
- 3Create a field named Dominant Goddess.
- 4Create a second field named Dormant Goddess.
- 5These fields will now appear on every contact record and can be used in email merge tags.
Create a new Workflow in GoHighLevel that is triggered by an incoming webhook from Typeform.
- 1Go to Automation > Workflows and click + Create Workflow.
- 2Click Add New Trigger and select Inbound Webhook.
- 3Note: The Inbound Webhook is a premium trigger in GoHighLevel — ensure your plan includes it.
- 4GHL will generate a unique Webhook URL. Copy this URL — you will need it in the next step.
- 5Save the workflow trigger.
Paste the GHL webhook URL into Typeform so that every quiz submission is automatically sent to your workflow.
- 1In Typeform, go to Connect > Webhooks and click Add a webhook.
- 2Paste the GHL Webhook URL you copied in the previous step.
- 3Enable the webhook and save.
- 4CRUCIAL: Fill out your Typeform quiz yourself with test data and submit it. This pushes a test payload of data to the webhook so GHL can see the data structure.
Back in your GHL Workflow, map the incoming Typeform data to the correct GHL contact fields, including your new Custom Fields.
- 1In your GHL Workflow, click on the Inbound Webhook trigger and look for the test data you just sent.
- 2Add your first Workflow Action: Create/Update Contact.
- 3Map the incoming data: Typeform email field → GHL Email field, Name → Name, etc.
- 4Scroll down to Custom Fields in the action menu.
- 5Map the Typeform dominant_goddess variable → your GHL 'Dominant Goddess' custom field.
- 6Map the Typeform dormant_goddess variable → your GHL 'Dormant Goddess' custom field.
Phase 4: The Email Automation Workflow
8 Branches × 1 Merge Tag = All 64 Combinations
In the same workflow you created in Phase III (after the Create/Update Contact action), add an If/Else action. This splits the workflow based on the dormant goddess — you only need 8 branches, not 64.
- 1In your GHL Workflow, after the Create/Update Contact action, click + Add Action.
- 2Select If/Else from the action list.
- 3Name the action 'Check Dormant Goddess'.
- 4Branch 1: Condition → Contact Details → Dormant Goddess → Is → 'Persephone'
- 5Branch 2: Condition → Contact Details → Dormant Goddess → Is → 'Hera'
- 6Continue adding branches until you have one for each of the 8 possible dormant goddesses.
- 7The 'All Other Cases' branch at the bottom acts as a safety net.
Under each of the 8 branches, add a Send Email action. Each email is tailored to the dormant goddess but uses a merge tag to dynamically insert the dominant goddess name.
- 1Under each If/Else branch, click + Add Action and select Send Email.
- 2Write an email focused on that branch's dormant goddess.
- 3To mention the dominant goddess dynamically, use the GHL Custom Value merge tag shown below.
- 4Because GHL saved their dominant goddess to their contact profile, the merge tag will automatically populate with the correct goddess name for each person.
- 5This single workflow handles all 64 possible dominant/dormant combinations.
Dynamic Email Template
// GHL merge tag for the dominant goddess:
{{contact.dominant_goddess}}

// Example email copy for the 'Persephone' branch:
"Welcome, sister. As you saw on the previous page,
your dominant energy is {{contact.dominant_goddess}}.

But what we didn't discuss on that page is your
dormant energy: Persephone.

Working with Persephone is crucial to your initiation
because..."
Key Insights
The four principles that make this funnel work without custom code or middleware.
No Zapier Required
GoHighLevel's native Inbound Webhook trigger handles the entire Typeform-to-GHL data transfer without any third-party middleware.
8 Branches, Not 64
The If/Else workflow only needs 8 branches (one per dormant goddess). The dominant goddess is inserted dynamically via a merge tag, covering all 64 combinations automatically.
Custom Fields, Not Tags
Tags are for internal segmentation. Custom Fields (Single Line Text) are what allow GHL to store and dynamically display the goddess names in emails and on pages.
URL Parameters = Dynamic Pages
GHL natively reads URL parameters and replaces {{placeholders}} on your landing page. No custom code needed — just append ?dominant=Athena to your redirect URL.
Is This Funnel Possible?
Yes, entirely. The full funnel — from Typeform quiz to personalized email — is achievable using native features of both platforms. No Zapier, no custom code, no 64 separate workflows. Any experienced GoHighLevel architect will look at this blueprint and know exactly how to build it in a few hours.
On the contractor situation: the architecture described (custom fields passed to a dynamic landing page) is correct. The issue is likely that Tags were used instead of Custom Variables, which is why data isn't flowing correctly. The fix is in Typeform's logic, not in any custom code.
Funnel Pages — Live Previews
All five funnel pages are built and ready. Open each to review the copy and design before handing off to your GHL tech team.
1 · Results Page
Dominant + dormant goddess content with GHL merge tags. All 8 goddesses × 2 roles = 16 content blocks.
Open preview ↗
Order Page2 · $27 Offer Page
Both full guides — Sacred Constellation Map. Testimonials included.
Open preview ↗
OTO Upsell3 · Upsell — Feminine Alchemy
$222 one-time offer (save $222). Countdown timer. Shown after $27 purchase.
Open preview ↗
Downsell4 · Temple of Her
$111/month membership downsell. Cancel anytime. Shown after declining upsell.
Open preview ↗
Final Offer5 · $1 Trial
14-day trial for $1, then $111/month. Final offer in the funnel.
Open preview ↗
References
Official documentation supporting every step in this guide.